How to build a Marching Lights on an Arduino:
by J.B. Wylzan
Project 6: Marching Lights:
This project controls two leds in this sequence: 4&6, 5&7, 6&8, 7&9 ... and so on ... in forward and reverse modes. Rewrite the sketch to simulate a pingpong ball motion.

9 LEDs
9 resistors, 200ohms
connecting wires
breadboard
Arduino R3 UNO
Schematic Diagram:

Block Diagram:

Code # 6:
/*
iHackLab Jumping Lights
powered by Arduino
sketched by J.B. Wylzan
modified by Lawsinium
Lights jump from one led to another led continuously.
Variables are introduced on this project.
This example code is public domain.
*/
// Initialize variable x
int x = 1000; //shortcut to change the value of x in delay(x)
// Setup pins 4 to 12
void setup()
{
pinMode(4, OUTPUT);
pinMode(5, OUTPUT);
pinMode(6, OUTPUT);
pinMode(7, OUTPUT);
pinMode(8, OUTPUT);
pinMode(9, OUTPUT);
pinMode(10, OUTPUT);
pinMode(11, OUTPUT);
pinMode(12, OUTPUT);
}
// makes light jumps from one led to another led continously.
void loop()
{
digitalWrite(4, HIGH); // turn the LED on
delay(x);
digitalWrite(4, LOW); // turn the LED off
digitalWrite(12, HIGH); // turn the LED on
delay(x);
digitalWrite(12, LOW); // turn the LED off
digitalWrite(6, HIGH); // turn the LED on
delay(x);
digitalWrite(6, LOW); // turn the LED off
digitalWrite(10, HIGH); // turn the LED on
delay(x);
digitalWrite(10, LOW); // turn the LED off
digitalWrite(5, HIGH); // turn the LED on
delay(x);
digitalWrite(5, LOW); // turn the LED off
digitalWrite(11, HIGH); // turn the LED on
delay(x);
digitalWrite(11, LOW); // turn the LED off
digitalWrite(7, HIGH); // turn the LED on
delay(x);
digitalWrite(7, LOW); // turn the LED off
digitalWrite(9, HIGH); // turn the LED on
delay(x);
digitalWrite(9, LOW); // turn the LED off
digitalWrite(8, HIGH); // turn the LED on
delay(x);
digitalWrite(8, LOW); // turn the LED off
}
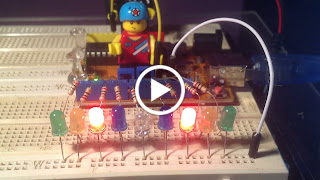
Actual Layout :

Procedure:
1. Build the model as shown above
2. Run the Arduino Interface
3. Select File > New
4. Copy Code #6 above
5. Paste Code #6
6. Click File > Save
7. Click Verify
8. Click Upload
9. Lights jump from one led to another led continuously.
Disclaimer: We shall not be liable for any loss or damage of whatever nature - direct, indirect, consequential, or otherwise - which may arise as a result of your use of any information on this website. However, if you are interested in using any of the projects for personal or educational purposes, please inform the author by email.
Public Domain Notice: Copyright (c) 2000. All rights reserved. This article is part of a book entitled iHackRobot. Copies are welcome to be shared or distributed publicly as long proper citations are observed. Please cite as follows: Biotronics: The Silver Species, Joey Lawsin, 1988, USA.
==================================================================
Patent Pending. 2000 © ®
A L.A.W.S.I.N. Educational Production
No comments:
Post a Comment